Well it was bound to happen!
Three years now after being asked to migrate DHCP from Windows DHCP server to Cisco Routers, and automating that convertion, it's finally going back the other way.
This time the PowerShell script will read through the file (an exported Cisco Router configuration) and build the Scopes in the Windows DHCP Role. The script will need to be run on the server becoming the DHCP server for those new scopes. The user would need to have administrator privilege to allow the DHCP settings to be made.
The script follows these steps:
- Reads through the configuration file and, using Regular Expressions, finds all DHCP Pools (Scopes), Static Assignments and Exclusions.
- Creates all the Scopes, along with all options found under that Pool in the router configuration file.
- Processes the Exclusions in to each Scope
- Process all static assignments
Still a little bit in the works at the time of this posting, but testing across multiple configurations has found it working well.
The Code Repository can be found on GitHub
Some DHCP Options are being handled as follows.
| Code |
Cisco Config |
Option Description |
| 3 |
default-router |
Default Gateway |
| 6 |
dns-server |
Domain Nameservers |
| 15 |
domain-name |
Domain Name |
| 42 |
option 42 ip |
NTP Servers |
| 43 |
option 43 hex |
Vendor Specific Option, usually WAP Controller IP |
| 51 |
lease |
Lease time |
| 66 |
next-server |
TFTP Server |
| 66 |
option 66 ip |
TFTP Server |
| 67 |
bootfile |
Boot filename |
| 67 |
option 67 ascii |
Boot filename |
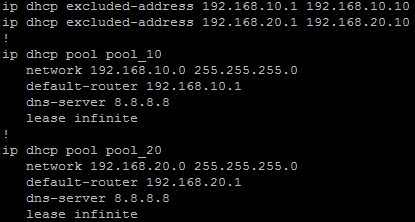
Example Cisco Config
ip dhcp excluded-address 10.10.0.1 10.10.1.0
ip dhcp excluded-address 10.10.3.220 10.10.3.223
ip dhcp excluded-address 192.168.0.1 192.168.0.9
!
ip dhcp pool PoolNumber1
 network 10.10.0.0 255.255.248.0
 update dns both override
 dns-server 10.10.255.1 10.10.255.2
 domain-name domainname.local
 option 42 ip 10.10.249.11 10.10.248.11
 default-router 10.10.0.1
 lease 8
!
ip dhcp pool PoolNumber2
 network 192.168.0.0 255.255.255.0
 dns-server 192.168.0.10
 option 43 hex f108.0afe.0064
 default-router 192.168.0.1
!
ip dhcp pool Device1
 host 10.10.1.30 255.255.248.0
 client-identifier 01b7.37eb.1f1a.0a
 default-router 10.10.0.1
!
ip dhcp pool Device2
 host 192.168.0.44 255.255.255.0
 client-identifier 0132.c19f.b7f3.3b
This script makes use of the IPv4Calc Module
Ansible and Netbox are not just for the high end data centre systems. They can also be used on networks using small to medium business switches and routers such as the Cisco SMB Product range.
Initial Auditing and OnBoarding
Initally I started with brand new empty Netbox. In which I manually created a base setup adding in each:
- Site
- Patch
- Device model in use
- Prefix, to begin with just the management subnets
Then creating a yaml file host listing to beging with, I ran an Ansible Playbook that then went through that list of devices pulling base device information:
- IP Address (Management)
- Hostname
- Model
- Serial number
- Firmware (This was not initally used)
This was then to record in to Netbox as new devices as well as exported to CSV. After I had the devices in Netbox I could do some base housekeeping and put them in the right sites, patches and rack locations.
Netbox, the Source of Truth
Once the devices were in and housekeeping done Netbox then became the Source of Truth for both our engineers and technicians and also for Ansible. I could remove the hosts yaml file an dpointing AQnsible at Netbox for its inventory I could now allow playbooks to be run against a site and other locations or across the whole group.
Minimum config
One of the frist tasks was to ensure I had all devices, configured to a standard. I hoped that they have been, but over time, without continued audits and checks, things can become a little out. So using Ansible I was able to ensure some defaults are set, such has:
- Disabling of access methods, such as HTTP, Telnet and also HTTPS
- NTP time servers and synchronised time
- Name Servers
- Monitoring service setting (SNMP)
Backup config
Another task for Ansible was to get regular configuration backups for all devices. Running an Ansible Playbook on a daily schedule (Cron) to pull the current configuration and store it on the local file system of the Ansible server. This was then replicated off site over secure protocols.
- name: Gather Facts
  gather_facts: no
  hosts: device_roles_switch
  vars:
    output_path: "{{ lookup('env', 'HOME') }}/backups/"

  tasks:
    ## Create backup folder for today
    - name: Get date stamp for filename creation
      set_fact: date="{{lookup('pipe','date +%Y%m%d')}}"
      run_once: true

    # Get Switch Config
    - name: Get Config
      community.ciscosmb.facts:
        gather_subset:
          - config

    - name: Save Config
      copy:
        content: "{{ ansible_net_config }}"
        dest: "{{ output_path }}{{ inventory_hostname }}-{{ date }}.txt"
Finding Trunks and Devices
Another task was find all the trunks between switches & patches and docuemnt them correctly in Netbox. Running an Ansible Playbook to use LLDP from gather facts to then determine th elinks between device, that could then be documented as Netbox cables. Once that was done I also used the Netbox Topology Views plugin to visualise the network.
Once that was done I could also use MAC address searches to determine what ports IP Phones, DAPs and WAPs were connected to among other devices. Since a standard brand of those was used throughout it was only a matter of searching for the manufacturer portion of the MAC address.
This is the second part (see part 1 here) of my migrating a static web site over to Pelican Static Site Generator, after my inital posting Pelican Static Site Generator
Google Analytics
To transfer over Google Analytics web site code to the Pelican created site was as simple as adding it in to pelicanconf.py as a varible and done.
Amended 2023-08-07
With Googles GA-4 a different approach was taken. I added a new varible to hold the GA4 code:
pelicanconf.py
GOOGLE_GA4_ID = your_site_code
Then in the base.html template I added the Google supplied HTML code in the head section, with the Jinja2 varible pulled from pelicanconf.py:
    <!-- Google tag (gtag.js) -->
    <script async src="https://www.googletagmanager.com/gtag/js?id={{ GOOGLE_GA4_ID }}"></script>
    <script>
      window.dataLayer = window.dataLayer || [];
      function gtag(){dataLayer.push(arguments);}
      gtag('js', new Date());

      gtag('config', '{{ GOOGLE_GA4_ID }}');
    </script>
    <!-- Google tag (gtag.js) -->
  </head>
Hosting and Replacing on Netlify
As the GatsbyJS site was hosted on Netlify which also supports Python and Pelican builds rehosting on Netlify was relatively easy.
First though was getting the source repository ready. Starting with making sure the requirements.txt file exists, as Netfliy build process will be using this to install the required python libraries for the site. I generally keep this up to date as I work, but simply creating it again with the usual command is easy enough:
pip freeze > requirements.txt
Then making sure the publishconf.py file has all the correct settings for the final published site. This was pretty much correct and needed only confirming that it had the correct variables in it for the final site. Overwriting the development variables stored in pelicanconf.py.
A netfliy.toml file in the root of the repo will give Netlify the commands to build the site and location of the built site files to publish:
[build]
command = "pelican content -s publishconf.py"
publish = "output"
also a block to specificy the page (HTML file) to display for a 404 page not found repsonse:
[[redirects]]
from = "/*"
to = "/404.html"
status = 404
Linking in the new repo
After those things are all settled it is just a matter of linking the GitHub repo to the the Netlify site, and Netfliy will do the rest. Building the site and publishing it ready for use.
So is that it?
Well, while I have the Pelican built site now the active builder for the static pages on the site, I still have plenty to work on. Plenty to upgrade including the theme, which is still not quite right, and of course content on the site for other projects and well whatever else is happening in life......